Creating My Serverless Blog - Part 1
Blog post header image by airpix on flickr
I’ve been planning to start a blog for some time and finally got around to it. This post is the first in a series on my journey setting up this blog and the tools I used in the process.
My Blog Site Requirements
My blog site requirements are:
- Simple and elegant blog site design that supports reader comments and engagement;
- Have full control of the blog site design, content and brand;
- Use my own personal domain,
aboikoni.net; - No infrastructure to provision and manage. I do not want to manage the underlying server and storage infrastructure. I want my blog site to be up and running with the least amount of operational effort and not having to worry about the site being up or not. I want to concentrate on producing blog content rather than managing infrastructure;
- Site is reachable over HTTPS only and all access over HTTP is redirected to HTTPS. Not only do modern browsers prefer HTTPS but Google Search also lists HTTPS as a page evaluating experience that may impact Google Search ranking. As I need all the “visibility” help I can get for my small site, better not add a deficiency 😏 ;
- Site is reachable over IPv4 and IPv6. My site needs to be reachable to the entire Internet and not just the legacy part;
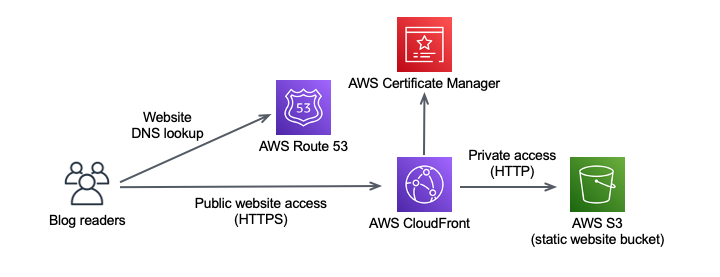
Based on the above requirements I came up with the following solution: a static and serverless blog site using the following tools and services:
- Hugo for static website generation;
- AWS S3 for blog content storage and serverless static website hosting;
- AWS CloudFront for SSL front-ending of S3 with a custom SSL certificate and Content Delivery Network (CDN) services;
- AWS Certificate Manager for public SSL/TLS certificate provisioning and automated certificate renewal;
- AWS Route53 for DNS hosting of the website domain;
- git and GitHub for version control;
- GitHub Actions for continuous deployment (CD) of the website;
Here is an initial high-level architecture of my serverless blog site:
In the following sections I will go into more detail how I satisfied my blog site requirements with serverless cloud services and static content generation.
Serverless Blog Site
I do not want to manage infrastructure (requirement 4️⃣ ) but I also want to “own” my blog site and be in full control of the blog in terms of design and building a brand (requirement 2️⃣ ). Based on these two requirements an online publishing platform such as Medium is not for me. While Medium (and other blog hosters like it) let you focus on blog content rather than managing infrastructure, you do relinquish some control over your blog design and brand.
Serverless cloud services let you focus on the application, or blog content in my case, and not be bothered with managing backend infrastructure. Furthermore, with serverless cloud services I can reap the following benefits:
- On-demand and flexible scalability;
- High availability;
- Pay per use;
For my blog I’m using AWS S3 and CloudFront to host a serverless static blog site. Something similar can be done using Microsoft Azure or Google Cloud Platform (GCP) services.
Hugo - Static Site Generator
A static site generator (SSG) is a tool that generates a static HTML website based on site configuration and content. The output of a SSG is a set of static files that form the website. Hugo is such a static site generator and the one I selected for my blog. Using Hugo together with serverless cloud services allows me to satisfy requirement 4️⃣ ✅ (no infrastructure to manage), while still being in full control of the blog design and brand, satisfying requirement 2️⃣ ✅ .
Why did I select Hugo and not one of the other popular static site generators, like Jekyll? I selected Hugo, mainly because it is easy to use, blazing fast, and its features include reader comment support. In addition, it has an active community with hundreds of so-called themes to customize your site. YMMV, it really comes down to determining which SSG you are most comfortable working with and helps fulfill your site requirements.
See the Comparing SSGs section for links to articles that compare Hugo and Jekyll.
There are many articles/blogs detailing how to install Hugo, including Hugo quick start instructions, so I will not go into the installation of Hugo here.
Creating My Blog Site
The hugo new site blog command creates the skeleton for the static website in the blog directory.
ombre@chaos github % hugo new site blog
Congratulations! Your new Hugo site is created in /Users/ombre/github/blog.

Just a few more steps and you're ready to go:

1. Download a theme into the same-named folder.
   Choose a theme from https://themes.gohugo.io/ or
   create your own with the "hugo new theme <THEMENAME>" command.
2. Perhaps you want to add some content. You can add single files
   with "hugo new <SECTIONNAME>/<FILENAME>.<FORMAT>".
3. Start the built-in live server via "hugo server".

Visit https://gohugo.io/ for quickstart guide and full documentation.
The skeleton of my new static web site looks like this:
ombre@chaos blog % tree
.
├── archetypes
│   └── default.md
├── config.toml
├── content
├── data
├── layouts
├── static
└── themes

6 directories, 2 files
Adding A Theme
Hugo themes are templates and styles to customize the website presentation. It is not easy to choose a theme from the 370+ (as of Feb. 2021) available Hugo themes. In the end, I selected the CleanWhite theme because of the minimalist and elegant blog style with support for reader comments through integration with Disqus. In doing so I could satisfy requirement 1️⃣ ✅ .
With my blog site under version control using git, I choose to embed the CleanWhite theme repository as a git submodule inside my blog Git repository. Git submodules allow you to keep a Git repository as a subdirectory (or subproject) of another Git repository (the superproject). This lets you clone another repository into your project and keep your project commits separate from the embedded repo.
ombre@chaos blog % git init
ombre@chaos blog % git submodule add https://github.com/zhaohuabing/hugo-theme-cleanwhite.git themes/hugo-theme-cleanwhite
Cloning into '/Users/ombre/github/blog/themes/hugo-theme-cleanwhite'...
remote: Enumerating objects: 44, done.
remote: Counting objects: 100% (44/44), done.
remote: Compressing objects: 100% (36/36), done.
remote: Total 776 (delta 16), reused 24 (delta 7), pack-reused 732
Receiving objects: 100% (776/776), 8.66 MiB | 8.40 MiB/s, done.
Resolving deltas: 100% (401/401), done.
On initial git add, with the embedded Hugo theme repo, I got the following warning message:
ombre@chaos blog % git add .
warning: adding embedded git repository: themes/hugo-theme-cleanwhite
hint: You've added another git repository inside your current repository.
hint: Clones of the outer repository will not contain the contents of
hint: the embedded repository and will not know how to obtain it.
hint: If you meant to add a submodule, use:
hint:
hint:   git submodule add <url> themes/hugo-theme-cleanwhite
hint:
hint: If you added this path by mistake, you can remove it from the
hint: index with:
hint:
hint:   git rm --cached themes/hugo-theme-cleanwhite
hint:
hint: See "git help submodule" for more information.
This warning message can be safely ignored as I deliberately embedded the Hugo theme using the git submodule command into the blog repo. For verification, use the git status command to check whether the blog Git repository does not include the Hugo theme content.
ombre@chaos blog % git status
On branch master

No commits yet

Changes to be committed:
  (use "git rm --cached <file>..." to unstage)
        new file:   .gitignore
        new file:   .gitmodules
        new file:   README.md
        new file:   archetypes/default.md
        new file:   config.toml
#
# Output text omitted for brevity
#
        new file:   themes/hugo-theme-cleanwhite
The above output shows the final line themes/hugo-theme-cleanwhite as an empty directory. This confirms that the contents of the themes directory will not be part of the blog repo. Now lets commit the blog content to my local repo with git commit:
ombre@chaos blog % git commit -m "Initial commit for my blog"
[master (root-commit) bd075fb] Initial commit for my blog
 34 files changed, 193 insertions(+)
 create mode 100644 .gitignore
 create mode 100644 .gitmodules
 create mode 100644 README.md
 create mode 100644 archetypes/default.md
 create mode 100644 config.toml
#
# Output text omitted for brevity
#
 create mode 160000 themes/hugo-theme-cleanwhite
Notice the 160000 mode for the themes/hugo-theme-cleanwhite entry (last line of above output). This is a special git mode that basically means I’m recording a commit as an empty directory entry rather than a directory with its contents. This is as expected for an embedded repo. Working with embedded Git repo’s also means that when I want to update the embedded Hugo theme I need to use specific git submodule commands, as a regular git pull will only update the superproject blog repo and not the embedded subproject Hugo theme repo. See also Git Tools - Submodules for details.
Customizing The Site
I made several customizations including a custom content template for new blog posts, custom footer and error page.
Custom Content Template For New Blog Posts
I created a custom content template archetypes/post.md to be used for each new post, e.g. when using hugo new post/newblog.md. A custom archetype takes precedence over the theme archetype. See also Hugo Archetypes.
ombre@chaos blog % cat archetypes/post.md
---
title:       "{{ replace .Name "-" " " | title }}"
subtitle:    ""
description: ""
date:        {{ .Date }}
author:      Stephen Ombre
image:       ""
tags:        ["tag1", "tag2"]
categories:  ["" ]
draft:       true
---
Custom Footer
The regular CleanWhite theme footer, themes/hugo-theme-cleanwhite/layouts/partials/footer.html, can be overridden by creating a custom footer file, layouts/partials/footer.html.
Custom Error Page
The CleanWhite theme has a very plain error page 404.html. The error page can be customized with the following configuration parameters in the main configuration file config.toml:
.Site.Params.image_404.Site.Params.title_404
# Error page text and image
  image_404 = "/img/erik-mclean-sxiSod0tyYQ-unsplash.jpg"
  title_404 = "Sorry, page was not found"
The image_404 used is by Erik Mclean on Unsplash.
Local Preview
Hugo includes its own web server which builds and serves the site, allowing you to run and preview the site on your local computer by running the hugo server command:
ombre@chaos blog % hugo server
Start building sites …
| EN
-------------------+-----
Pages | 33
Paginator pages | 0
Non-page files | 0
Static files | 64
Processed images | 0
Aliases | 10
Sitemaps | 1
Cleaned | 0
Built in 372 ms
Watching for changes in /Users/ombre/github/blog/{archetypes,content,data,layouts,static,themes}
Watching for config changes in /Users/ombre/github/blog/config.toml
Environment: "development"
Serving pages from memory
Running in Fast Render Mode. For full rebuilds on change: hugo server --disableFastRender
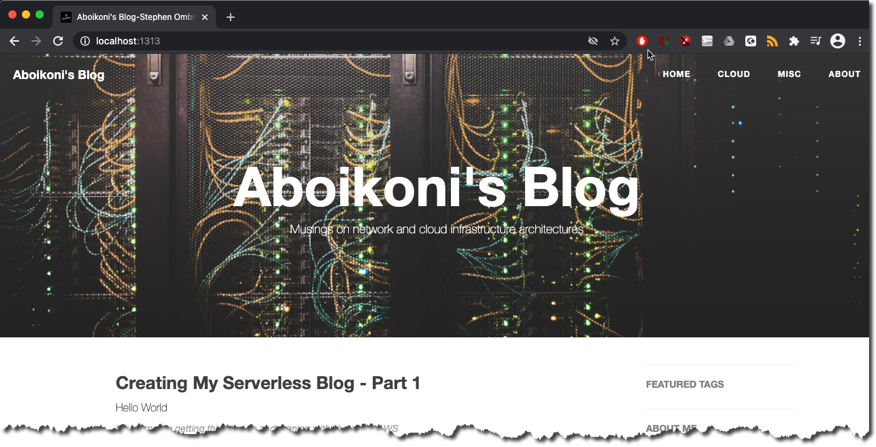
Web Server is available at http://localhost:1313/ (bind address 127.0.0.1)
Press Ctrl+C to stop
And this is what the resulting main blog page looks like:
Summary
In this initial blog post I went into
- the requirements for my blog site;
- the tools used thus far to create my blog: Hugo, git and GitHub;
- how to generate static blog content using Hugo, a static site generator;
- how to customize the site by selecting and configuring the CleanWhite theme;
- how to preview the blog site locally on my laptop;
Up to now I only have the blog site running on my local system. In subsequent blog posts I will go into how I use AWS services to host my blog site on the Internet and how I automate the site deployment. Stay tuned.
Comparing SSGs
- Hugo or Jekyll? 6 Factors You Should Know
- Hugo vs. Jekyll: Comparing the leading static website generators
- How to Choose the Right Static Generator: Jekyll vs. Hugo vs. Hexo
comments powered by Disqus