Creating My Serverless Blog - Part 2
Blog post header image by Pixabay from Pexels
In part 1 of this “Creating My Serverless Blog” series I started my static blog site journey with Hugo on my laptop. In part 2 I’ll proceed on my journey by hosting my blog site on the Internet using the following AWS services:
- AWS S3 for blog content storage and serverless static website hosting;
- AWS CloudFront for SSL front-ending of S3 with a custom SSL certificate and Content Delivery Network (CDN) services;
- AWS Certificate Manager (ACM) for SSL/TLS certificate provisioning and automated renewal;
- AWS Route53 for DNS hosting of the website domain;
At the end of blog post part 1 I had the following situation as it pertains to my blog site requirements (with the requirements already fulfilled indicated with a ✅ ):
- Simple and elegant blog site design that supports reader comments and engagement ✅ ;
- Have full control of the blog site design, content and brand ✅ ;
- Use my own personal domain,
aboikoni.net; - No infrastructure to provision and manage;
- Site is reachable over HTTPS only and all access over HTTP is redirected to HTTPS;
- Site is reachable over IPv4 and IPv6;
In the remainder of this blog post I’ll go into how I fulfilled the other blog requirements.
S3 Static Website Hosting
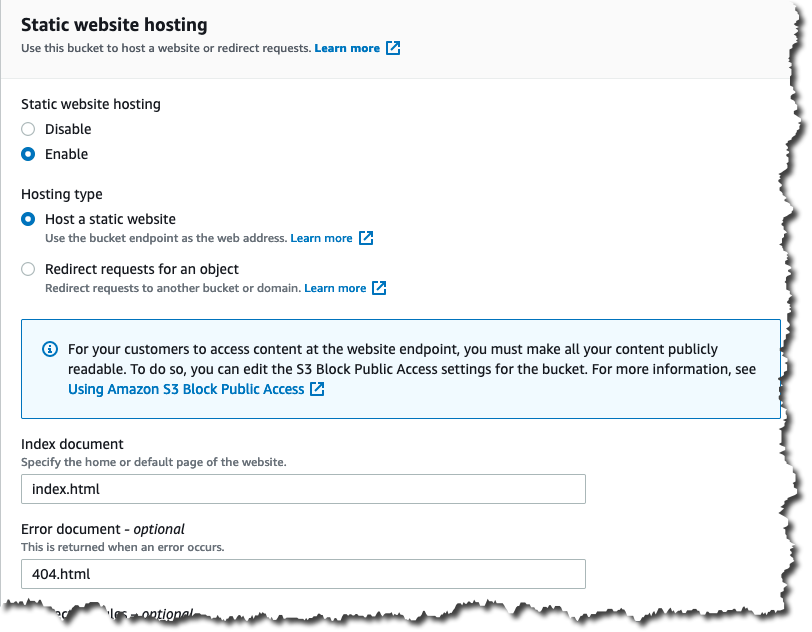
I’m using AWS S3 for blog content storage and serverless static website hosting. S3’s simple static website hosting enables you to host a static website that serves pre-built content (e.g. generated by Hugo) to the user’s web browser from an S3 bucket. When enabling website hosting on an S3 bucket, you must configure and upload an index and error document. An index document is a web page that S3 returns when a request is made to the root of a website or subfolder. With S3 static website hosting you must have an index document at each level of your blog folder structure and these index documents must have the same file name, e.g. index.html.
If a user enters https://www.aboikoni.net/top/about/ in a browser, the user is not requesting any specific page or S3 object. In that case, S3 serves up the index document located in that S3 folder. And if there is no index document in that folder, S3 will serve up the configured error document. This is exactly the behavior we want from a static website in combination with a static site generator (SSG) such as Hugo. Using Hugo, you should organize your content in a manner that reflects the rendered website. Hugo generates an index.html for each blog (sub)folder, see below partial listing of my Hugo generated blog content. Refer to how Hugo organizes content for details.
ombre@chaos blog % tree public | tail -20
│   │           └── index.html
│   ├── route53
│   │   ├── index.html
│   │   ├── index.xml
│   │   └── page
│   │       └── 1
│   │           └── index.html
│   └── s3
│       ├── index.html
│       ├── index.xml
│       └── page
│           └── 1
│               └── index.html
└── top
    ├── about
    │   └── index.html
    ├── index.html
    └── index.xml

60 directories, 127 files
ombre@chaos blog %
When a bucket is configured as a static website, the website is available at a region-specific website endpoint (1), e.g. http://<bucket-name>.s3-website-<region>.amazonaws.com. There are, however, two issues with serving web content directly out of S3:
- Requires public access to the S3 bucket which also enables direct access to the website endpoint making my site available over both the custom domain as well as the S3 web endpoint hostname. In addition, Google Search may “make appropriate adjustments in the indexing and ranking” of my site for what Google calls creating duplicate content, i.e. making the same content publicly accessible (and Google Search indexed) over two different URLs;
- Although an S3 website endpoint is optimized for web access, it only supports access over HTTP and not over HTTPS;
Both issues violate my blog requirements, but luckily both can be solved by using AWS CloudFront to front-end the static website S3 bucket using the website endpoint as origin, with access restricted by a Referer header. With this solution I can restrict access to the S3 website bucket by setting up a custom Referer header on the CloudFront distribution. With an S3 bucket policy I can restrict access to requests brokered through CloudFront and using the custom Referer header.
Follow the step-by-step instructions to configure an S3 static website. However in step 4, instead of configuring a bucket policy that provides public access, configure a restricted bucket policy similar to the one detailed below.
Here is a screenshot of the static website configuration of my S3 blog bucket:
Here is a screenshot of the S3 blog bucket permissions:
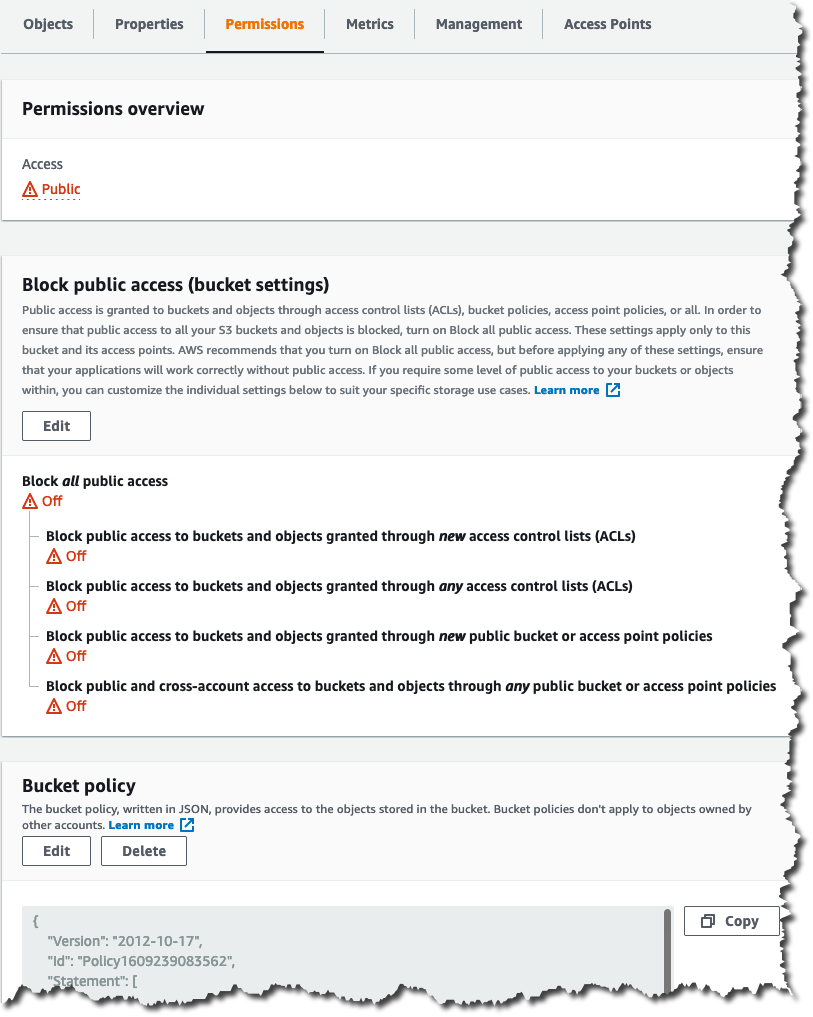
Instead of allowing blanket public access to the blog bucket I use a restricted bucket policy with two statement elements:
S3FullAccess: provides full S3 access to the website bucket and its contents for a specific IAM user, e.g. to upload content and/or update bucket policies;CloudFrontRestrictedAccess: provides “public” read access to the bucket objects but only when theaws:Referercondition is met (by CloudFront). Unfortunately, there is no way to further restrict the principal to just CloudFront and the any (*) principal is necessary. Note, that anyone with access to the S3 and CloudFront configuration will be able to view theaws:Referersecret.
{
    "Version": "2012-10-17",
    "Id": "Policy1609239083562",
    "Statement": [
        {
            "Sid": "S3FullAccess",
            "Effect": "Allow",
            "Principal": {
                "AWS": "arn:aws:iam::xxxxxxxxxxxx:user/ombre"
            },
            "Action": "s3:*",
            "Resource": [
                "arn:aws:s3:::<blog-bucket>",
                "arn:aws:s3:::<blog-bucket>/*"
            ]
        },
        {
            "Sid": "CloudFrontRestrictedAccess",
            "Effect": "Allow",
            "Principal": "*",
            "Action": [
                "s3:GetObject",
                "s3:GetObjectVersion"
            ],
            "Resource": "arn:aws:s3:::<blog-bucket>/*",
            "Condition": {
                "StringLike": {
                    "aws:Referer": "my-very-big-referer-secret"
                }
            }
        }
    ]
}
The corresponding CloudFront configuration can be found in the CDN With AWS CloudFront section.
Certificate Management With AWS Certificate Manager (ACM)
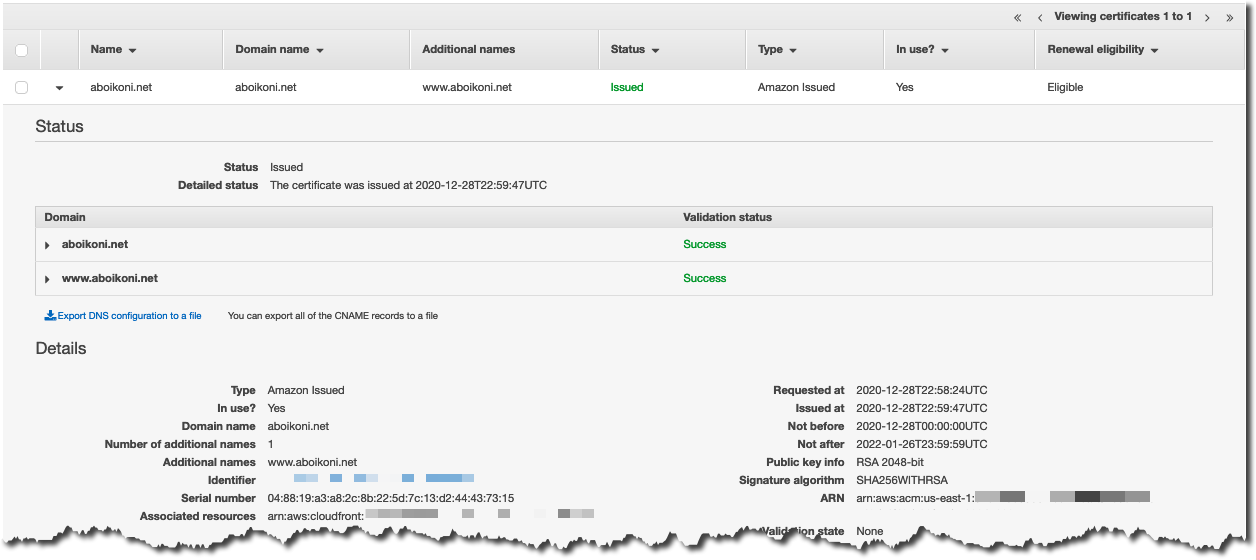
I want my blog site to be reachable using my custom DNS domain, aboikoni.net, instead of the CloudFront hostname, e.g. distrib12345.cloudfront.net, that is associated with a provisioned CloudFront distribution. For my custom domain I need an SSL certificate and the AWS Certificate Manager (ACM) service allows me to request a certificate, and automate certificate renewals, for free. You can create a public certificate by following these requesting a public certificate instructions. To use this certificate in combination with CloudFront you will need to create the certificate in the us-east-1 region as this is the only region that CloudFront can read ACM-generated certificates from. Make sure you list all domain names you want to associate with the website, which in my case are aboikoni.net and www.aboikoni.net.
Before ACM provisions the certificate it needs to validate you actually own or control the domain names associated with the certificate. ACM uses either DNS- or email-based domain validation. I prefer DNS validation as this is the AWS recommended method and it supports fully automated certificate renewals. ACM DNS validation uses CNAME (Canonical Name) records to validate that you own or control a domain. In my case, two CNAME records are required: one for aboikoni.net and one for www.aboikoni.net. Certificates are automatically renewed as long as the certificate is in use, i.e. the certificate is actively associated with an AWS service, and the associated DNS validation CNAME records remain in place. So, using ACM, there is no need to (manually) renew and install certificates every two years or so.
Here is a screenshot of the ACM console with the blog certificate details:
CDN With AWS CloudFront
AWS CloudFront is a fast content delivery network (CDN) service that works seamlessly with any AWS origin, such as S3, or with any custom HTTP origin. CloudFront is massively scaled and globally distributed in over 200 AWS edge locations that are interconnected via the AWS backbone.
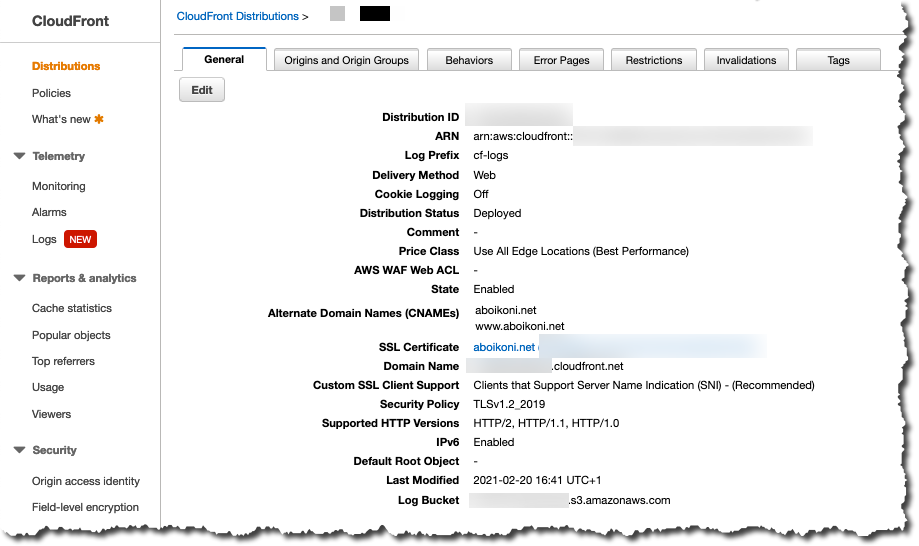
As previously stated, I need to create a CloudFront web distribution to front-end an S3 static website endpoint with restricted access. Follow the “Create a CloudFront distribution” steps, including using the “Referer” Origin Custom Header, to forward/broker traffic to the origin S3 bucket. You hereby restrict access to the origin S3 bucket such that blog content is only publicly accessible through the CloudFront web distribution and inaccessible through the S3 website endpoint URL.
Here is a screenshot of the general configuration of my CloudFront web distribution (note that IPv6 is enabled):
Here is a screenshot of CloudFront origin settings:
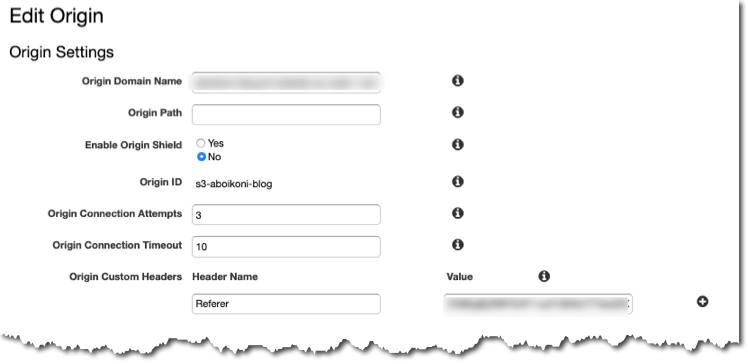
Here is a screenshot of CloudFront cache behavior configuration (redirecting HTTP to HTTPS):

DNS Hosting With AWS Route53
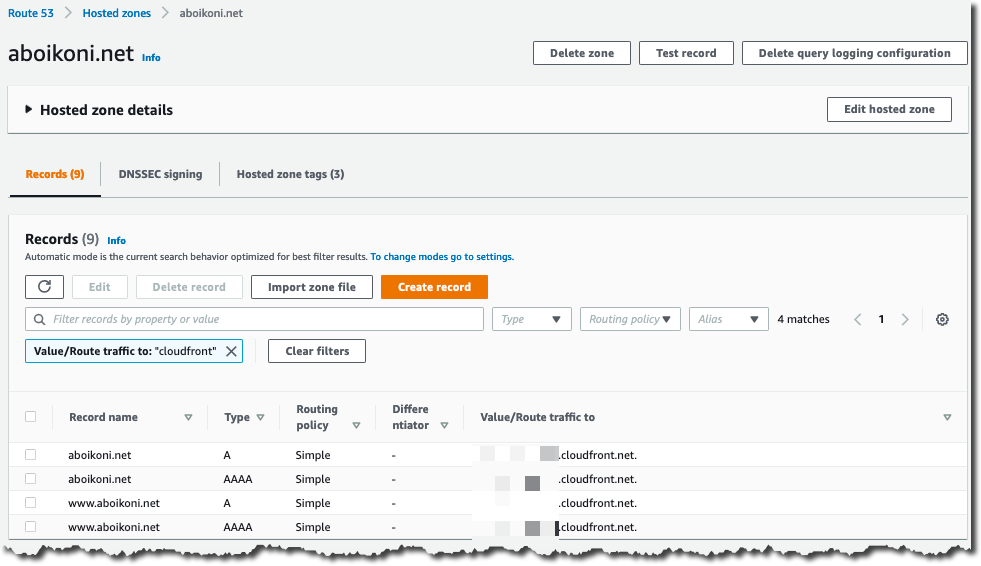
After creating my blog CloudFront web distribution my static blog site is now reachable via the CloudFront hostname, e.g. distrib12345.cloudfront.net. But to have my blog site accessible via my custom domain, aboikoni.net, I need to create DNS records that reference the CloudFront web distribution hostname. As my custom DNS domain is hosted on AWS Route53 I can use Route53-custom alias records rather than CNAME records. Here is a screenshot of the Route53 blog (alias) resource record sets for both IPv4 and IPv6:
Testing Website Access
During initial testing of my blog site I used AWS Web Application Firewall (WAF) in combination with CloudFront to restrict blog site access to traffic sourced from my home network only. This allowed me to test whether the website is working as expected and to fine-tune the site design without having the website accessible to the general public. While Hugo allows you to preview your site locally, the preview option does not show all site functionality. For example, the error page and the reader comments section are not presented when running the site locally. Once I was happy with the site I removed the WAF restrictions to enable full public access.
To verify that the configured website access policies have the expected outcomes I performed the following curl verification tests:
Direct access to the blog S3 static website bucket is prohibited (as per the restricted S3 bucket policy):
ombre@chaos ~ % curl -I http://<bucket-name>.s3-website-<region>.amazonaws.com
HTTP/1.1 403 Forbidden
x-amz-error-code: AccessDenied
x-amz-error-message: Access Denied
x-amz-request-id: C7FDFD0C884FB409
x-amz-id-2: IEBymr7vq2lf/C5yLTlsjLAqSSS5QMw5jX2biMU9aCj0XIOKMRIKimbsmSDKPzNVgZsofjmUXpY=
Date: Fri, 26 Feb 2021 21:58:04 GMT
Server: AmazonS3
Blog site access over HTTP is redirected to HTTPS (conform configured CloudFront cache behavior):
ombre@chaos ~ % curl -I http://www.aboikoni.net
HTTP/1.1 301 Moved Permanently
Server: CloudFront
Date: Fri, 26 Feb 2021 21:59:12 GMT
Content-Type: text/html
Content-Length: 183
Connection: keep-alive
Location: https://www.aboikoni.net/
X-Cache: Redirect from cloudfront
Via: 1.1 1396f0307ab4835adf6e4163507d4c8a.cloudfront.net (CloudFront)
X-Amz-Cf-Pop: AMS54-C1
X-Amz-Cf-Id: rZ7HyvNSZoEnZl-PWKRTT4uAM28AzO_Wrs8IsU5QXUtlXWcojbSweA==
Blog site access over HTTPS is successful:
ombre@chaos ~ % curl -I https://www.aboikoni.net
HTTP/1.1 200 OK
Content-Type: text/html
Content-Length: 2327
Connection: keep-alive
Date: Fri, 26 Feb 2021 21:59:20 GMT
Cache-Control: max-age=604800, no-transform, public
Content-Encoding: gzip
Last-Modified: Sat, 20 Feb 2021 15:10:59 GMT
ETag: "16eaaaf96ea5a226d35dd43df58a2fea"
Server: AmazonS3
X-Cache: Miss from cloudfront
Via: 1.1 f655cacd0d6f7c5dc935ea687af6f3c0.cloudfront.net (CloudFront)
X-Amz-Cf-Pop: AMS54-C1
X-Amz-Cf-Id: DTTVoeqo45yRAy7T7Da9sS3MnK2ERjoz1K6MjqthhcSPvf0L8pDVXQ==
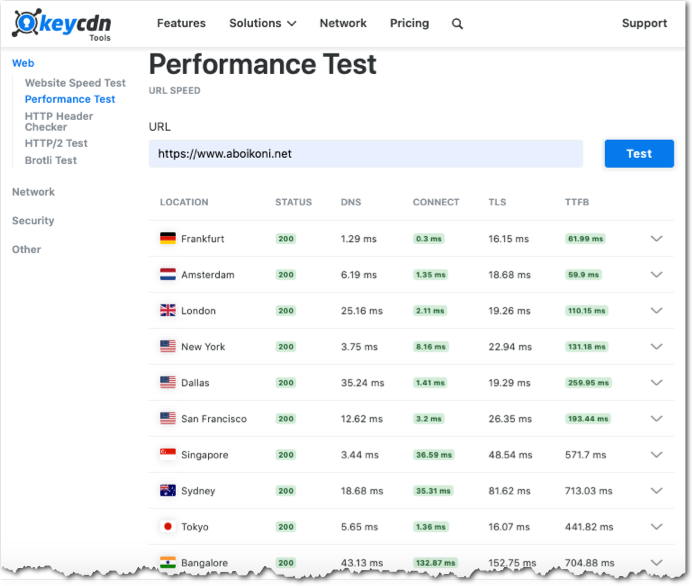
To gauge my blog site performance I used KeyCDN performance test that measures the site performance from 10 vantage points spread across the globe. The KeyCDN performance test results are broken down by component: DNS time, Connect time, TLS time, time to first byte (TTFB).
I also used PageSpeed Insights to measure the performance of a specific page from the perspective of mobile and desktop devices. PageSpeed Insights also provides suggestions on how the page performance may be improved. The PageSpeeds Insights test results for the first blog post show there is room for improvement for mobile devices (left side of below picture) with a 81 out of 100 score.

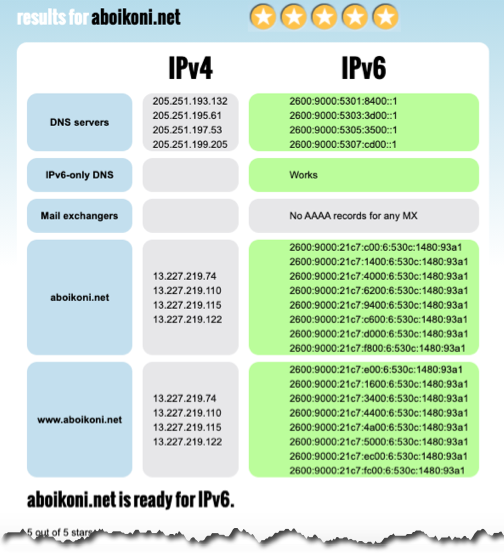
And last but not least I validated the blog site reachability over IPv6 using the following online IPv6 reachability tools:
Here are the ip6.nl test results (5 out of 5 stars):
Summary
In this blog post I continued on my static blog journey and started hosting a Hugo generated static blog site on the Internet using AWS services. I now have a serverless blog site with the following situation:
- A static website generated by Hugo, hosted on S3 and front-ended by CloudFront;
- Public access is allowed through CloudFront over HTTPS and HTTP access is redirected to HTTPS;
- Website is accessible on both IPv4 and IPv6;
- Public access to the origin S3 website bucket is prohibited;
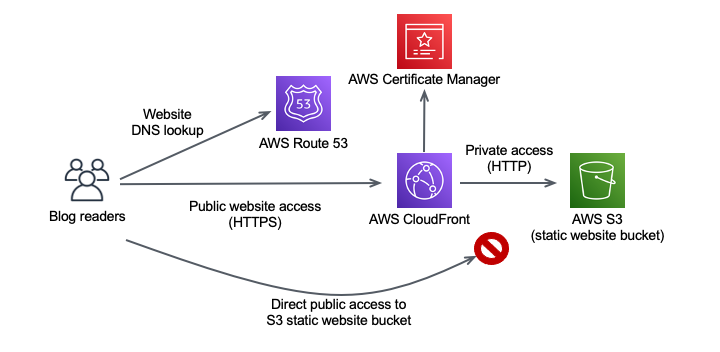
The above serverless blog architecture fulfills all my blog requirements:
- Simple and elegant blog site design that supports reader comments and engagement ✅ ;
- Have full control of the blog site design, content and brand ✅ ;
- Use my own personal domain,
aboikoni.net✅ ; - No infrastructure to provision and manage ✅ ;
- Site is reachable over HTTPS only and all access over HTTP is redirected to HTTPS ✅ ;
- Site is reachable over IPv4 and IPv6 ✅ ;
In the third, and final, blog post of this “Creating My Serverless Blog” series I’m going to automate the publishing of new blog content using GitHub Actions.
Note that AWS S3 has two endpoint types, a website endpoint and a REST API endpoint. Checkout their key differences. ↩︎
comments powered by Disqus