Creating My Serverless Blog - Part 3
Blog post header image by Yancy Min on Unsplash
This is the final blog post in the “Creating My Serverless Blog” series. I started my serverless blog journey in part 1 with a Hugo generated static blog site running locally on my laptop. In part 2 I continued on my journey by hosting my blog site on the AWS cloud. In this blog post I will proceed on the final leg of my serverless blog journey by automating the publishing of new blog content using a GitHub Actions continuous deployment (CD) pipeline.
Manual Deployment
To be able to automate manual and repetitive tasks you first have to identify them. To publish new blog content the following main tasks are required:
- Generate the static blog site using Hugo;
- Upload the generated static blog site to the AWS S3 origin bucket;
- Invalidate the AWS CloudFront cache such that the latest blog content is generally available to blog readers;
I found two manual approaches to accomplish the above tasks:
Using a combination of
hugoand AWS CLI commands,aws s3andaws cloudfront:rm -fr public hugo --minify cd public aws s3 sync . s3://<bucket-name>/ --sse --delete aws cloudfront create-invalidation --distribution-id <DISTRIBUTION-ID> --paths "/*"Using
hugoonly and leveraging the built-in Hugo Deploy capability:rm -fr public hugo --minify hugo deploy --maxDeletes -1 --invalidateCDN
Both approaches assume they are run in the blog directory with up-to-date local blog and embedded Hugo theme Git repo’s (1). In addition, some housekeeping is required to clean up previously generated blog content in the default (public) Hugo output directory (2). With hugo --minify I’m able to generate a smaller website payload allowing it to load faster. Minification refers to the process of removing unnecessary or redundant data without affecting how the resource is processed by a web browser, e.g. code comments and formatting, removing unused code, using shorter variable and function names, etc. With resource minification it is often possible to significantly reduce the size of the site’s web payload without affecting its actual meaning and presentation.
Of the above two approaches I prefer the second approach as it accomplishes the following with a single hugo deploy command:
- Compares MD5 hashes of the local and remote blog content and only uploads the changed files to S3. This cannot easily be done using
aws s3 syncor only in a roundabout, and imperfect, manner by comparing file sizes using the--size-onlyoption; - Deletes remote files that are not found locally. This can also be accomplished with the
aws s3 sync --deleteoption; - By default, skips internal/hidden operating system files, e.g. macOS'
.DS_Store. This can be accomplished as well withaws s3 sync --excludeoption, however, it has an unwanted side-effect that files matching the exclude pattern on S3 will be excluded as well. And this may not be intended; - AWS S3 can serve
gzip-ed compressed files which allows you to minimize the volume of data transferred between S3 and CloudFront. Using AWS CLI commands you would need to compress files separately before you upload them to S3. Using theaws s3 sync --cache-controloption you can control CloudFront’s response behavior by setting the relevant Cache-Control metadata on objects uploaded to the origin S3 bucket. However, multiple iterations of theaws s3 sync --cache-controlcommand may be necessary when different content-specific optimizations are required. Withhugo deploycontent-specific behavior is configured separate from the command itself, with Hugo deployment configuration, allowing for a singlehugo deployiteration; - Invalidates CloudFront cached content;
Here is a run of the hugo deploy approach after blog content updates have been applied:
ombre@chaos blog % rm -fr public
ombre@chaos blog % hugo --minify
Start building sites …

                   | EN
-------------------+-----
  Pages            | 37
  Paginator pages  |  0
  Non-page files   |  0
  Static files     | 66
  Processed images |  0
  Aliases          | 12
  Sitemaps         |  1
  Cleaned          |  0

Total in 479 ms
ombre@chaos blog %
ombre@chaos blog % hugo deploy --maxDeletes -1 –invalidateCDN
Deploying to target "aboikoni-blog" (s3://<bucket-name>?region=<region>)
Identified 114 file(s) to upload, totaling 6.5 MB, and 6 file(s) to delete.
Success!
Invalidating CloudFront CDN...
Success!
The above output shows that 114 files were uploaded to, and 6 files deleted from, the origin S3 bucket. For comparison, see the below output of a subsequent hugo deploy command run that was executed immediately after the previous one, i.e. without intermediate blog content changes. The output shows that no file changes were detected and hence no actions required:
ombre@chaos blog % hugo deploy --maxDeletes -1 --invalidateCDN
Deploying to target "aboikoni-blog" (s3://<bucket-name>?region=<region>)
No changes required.
To be able to use Hugo deploy I need to have an appropriate Hugo Deploy configuration. Here is the Hugo deployment configuration snippet from my blog’s Hugo configuration file, config.toml:
# hugo deploy configuration, see also
# https://gohugo.io/hosting-and-deployment/hugo-deploy/
[deployment]
[[deployment.targets]]
name = "aboikoni-blog"
URL = "s3://<bucket-name>?region=<region>"

# Deploy to invalidate the CloudFront distribution cache as needed
cloudFrontDistributionID =	"<DISTRIBUTION-ID>"

#  Compress and cache static assets for 1 week.
[[deployment.matchers]]
pattern = "^.+\\.(css|eot|html|ico|js|json|otf|svg|ttf|xml)$"
cacheControl = "max-age=604800, no-transform, public"
gzip = true

#  Cache static assets for 1 week, compression not required.
[[deployment.matchers]]
pattern = "^.+\\.(gif|jpg|jpeg|png|woff|woff2)$"
cacheControl = "max-age=604800, no-transform, public"
gzip = false
The above Hugo deploy config snippet has two content-specific deployment behaviors ([[deployment.matchers]]):
- The first behavior gzip compresses matched file types, e.g. CSS and HTML, and applies the following origin cache-control directives:
max-agespecifies the maximum amount of time (in seconds) that a cached copy of a resource is valid. After expiring a browser or intermediate cache, such as CloudFront, must refresh its version of the resource by fetching it from the origin. In my case themax-ageis set to 1 week (604800 seconds). Note, this applies for both the browser and an intermediary cache such as AWS CloudFront;no-transformspecifies that an intermediary, regardless of whether it implements a cache, must not transform the payload;publicspecifies that any intermediary cache may store the response;
- The second behavior applies to files that are already compressed, e.g. JPG and PNG image files, so additional compression is not required and only origin cache-control directives are applied;
Here is an example of the S3 metadata set on an HTML object that was uploaded to the blog origin S3 bucket using hugo deploy:

Continuous Deployment
The above Hugo publishing/deployment process works just fine, however, it remains a manual process. Even if the tasks are combined into a deploy script, I would need to manually invoke the deploy script every time I would like to publish new blog content. And if I manually need to perform a series of commands more than twice, I should automate it. I would like to automatically publish new blog content when changes are made to my blog master branch. This is where continuous integration and continuous delivery/deployment (CI/CD) tools come to the rescue to automate the publishing process. GitHub Actions is such a CI/CD tool that enables you to create CI/CD pipelines (which GitHub calls workflows) that can be used to build, test, package, release, or deploy a project on GitHub. As my blog Git repository is hosted on GitHub, it makes sense to use GitHub Actions for my blog publishing automation.
GitHub Actions
GitHub Actions are event-driven and can run a series of commands that are triggered by the occurrence of a specified GitHub event. An event automatically triggers a workflow, which contains one or more jobs. A job uses steps to control the order in which either an action, or a shell command, is run. A job is executed on a runner, which can be GitHub-hosted or a privately owned host. Please refer to this introduction to GitHub Actions for more details.
GitHub Actions are free for private repositories for up to 2,000 job minutes per month and 500MB storage, see also billing for GitHub Actions. This is more than enough for a continuous deployment pipeline for publishing my blog. Using GitHub Actions I can trigger a website build-and-publish workflow on a git push to the blog master branch.
The following is required to implement my GitHub Actions workflow:
- (Dedicated) “deploy” credentials, with least privilege permissions, to allow the GitHub Actions workflow to execute required tasks on the blog S3 bucket and CloudFront;
- GitHub secrets that securely store deploy credentials and securely make them available to the GitHub Actions workflow;
- The GitHub Actions workflow code itself, i.e. the automated process that is triggered by a GitHub event;
GitHub Actions Deploy Credentials
My GitHub Actions workflow needs the appropriate permissions to be able to perform workflow actions on my AWS blog resources. For this purpose I’m using dedicated “deploy(ment)” credentials that are only used for my blog publishing continuous deployment (CD) pipeline. For the “deploy” credentials I’ve created a single-purpose and dedicated IAM user, hugodeploy, which is a member of the dedicated deploy IAM group, hugodeploy-group. The IAM group has the following role-based, and least privilege, IAM inline policy attached:
{
  "Version": "2012-10-17",
  "Statement": [
    {
      "Sid": "S3GitHubActions",
      "Effect": "Allow",
      "Action": [
        "s3:PutObject",
        "s3:GetObject",
        "s3:DeleteObject",
        "s3:ListBucket",
        "s3:GetBucketPolicy"
      ],
      "Resource": [
        "arn:aws:s3:::<bucket-name>",
        "arn:aws:s3:::<bucket-name>/*"
      ]
    },
    {
      "Sid": "CFGitHubActions",
      "Effect": "Allow",
      "Action": [
        "cloudfront:CreateInvalidation"
      ],
      "Resource": [
        "arn:aws:cloudfront::xxxxxxxxxxxx:distribution/<DISTRIBUTION-ID>"
      ]
    }
  ]
}
GitHub Actions Secrets
GitHub encrypted secrets enable me to securely use the previously created hugodeploy credentials in my GitHub Actions workflow. GitHub encrypted secrets securely store sensitive data, such as deploy credentials, in your repository and make them available for use in GitHub Actions workflows. Here is how you create GitHub encrypted secrets for your repository.
The hugodeploy credentials, access key ID and secret access key, are securely stored as respectively HUGODEPLOY_AWS_ACCESS_KEY_ID and HUGODEPLOY_AWS_SECRET_ACCESS_KEY.

These secrets can then be used by a workflow action as an input, or environment variable, using the secrets context, e.g.
secrets.HUGODEPLOY_AWS_ACCESS_KEY_IDsecrets.HUGODEPLOY_AWS_SECRET_ACCESS_KEY
GitHub Actions Workflow
GitHub Actions workflows are YAML files that are a part of your GitHub repository and located in the .github/workflows directory. Here is a (partial) screenshot of my GitHub Actions workflow code (hugodeploy.yml) as seen in the GitHub web interface:
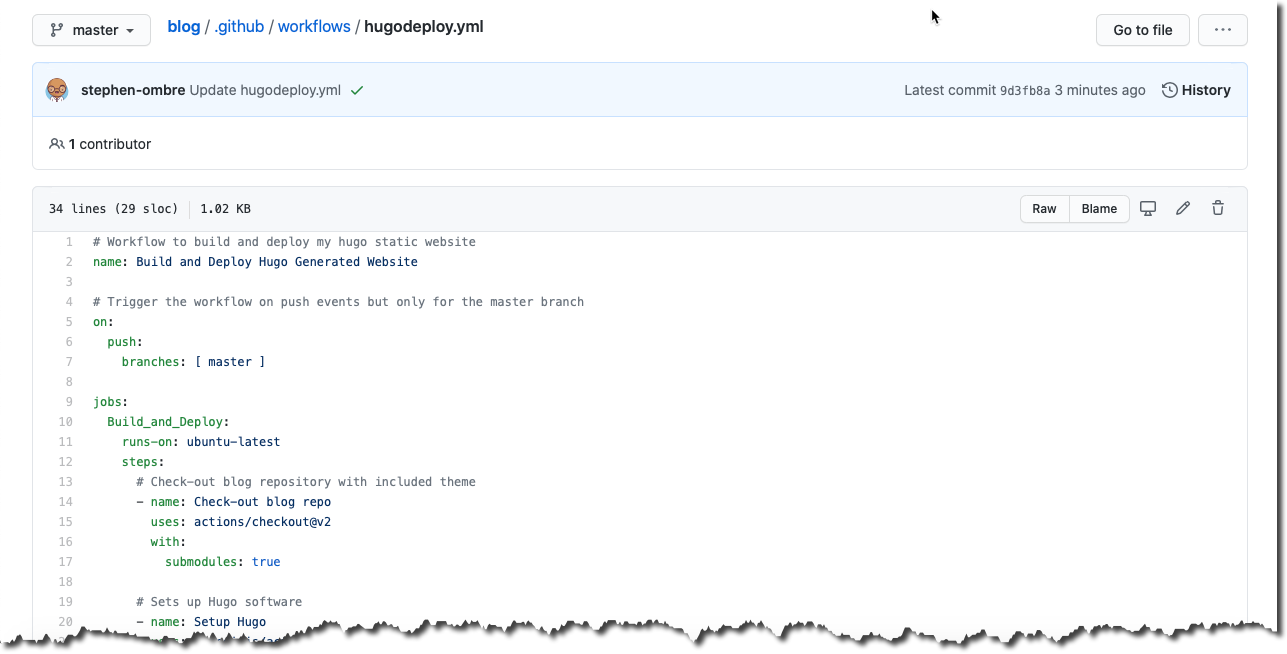
Here is complete code listing of my hugodeploy.yml GitHub Actions workflow:
| |
Let’s walk-through the hugodeploy.yml workflow code:
- line 2: Name of the workflow;
- lines 5-7: The workflow is triggered on a
git pushevent to themasterbranch; - lines 9-12: The workflow contains a single job,
Build_and_Deploy, which runs on the latest version of Ubuntu and has multiple (4) steps:- lines 14-17: Step #1 uses a GitHub community action,
actions/checkout, that checks out the blog repository including the embedded Hugo theme repo (with thesubmodulesoption); - lines 20-23: Step #2 uses another GitHub community action,
peaceiris/actions-hugo, that installs the specified Hugo software version; - lines 26-27: Step #3 runs the, in step #2 installed, Hugo software in a command shell. The
hugo --minifycommand generates the static site content in compact (minimized) form. I’m using GitHub-hosted runners to run the GitHub Actions workflow to avoid having to manage my own runners. And as GitHub-hosted runners run each job in a fresh environment, there is no need for the “housekeeping” tasks that I referred to in the Manual Deployment section; - lines 30-34: Step #4 runs
hugo deployin a command shell to deploy the generated static site content to the origin S3 bucket and invalidate the CloudFront cache. This step has environmental variables attached that reference thehugodeployGitHub secrets allowing this step to perform its intended actions on my AWS blog resources;
- lines 14-17: Step #1 uses a GitHub community action,
Here is a screenshot of the first successful run of my hugodeploy.yml GitHub Actions workflow:
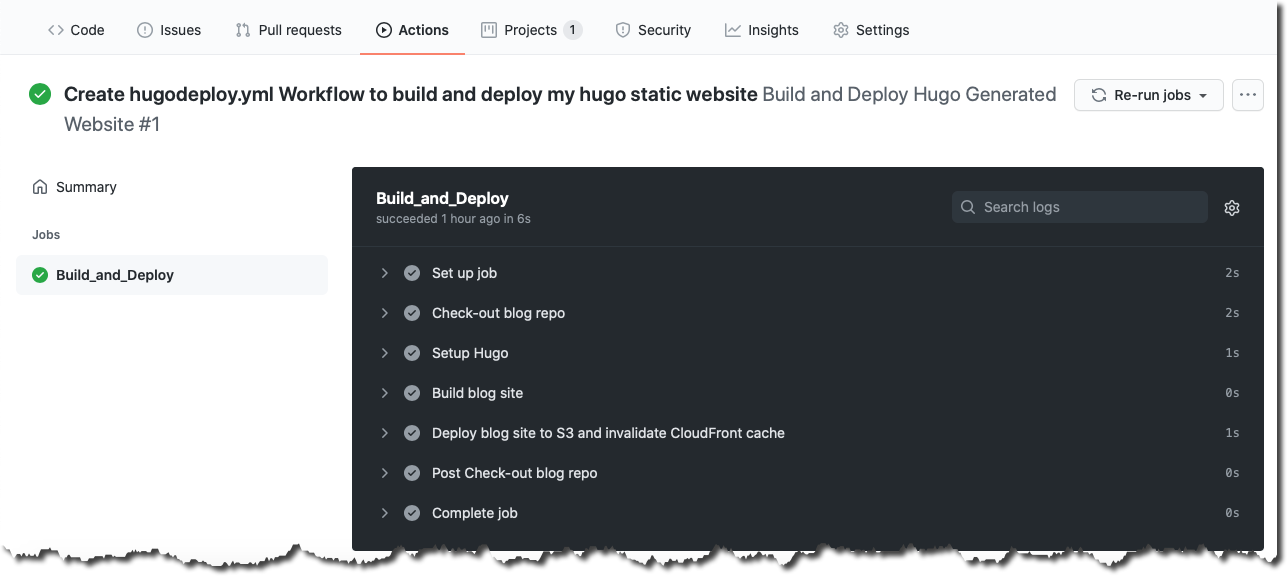
To publish new blog content all I need to do is push my blog updates, or complete a pull request, to the master branch. This event triggers the automated execution of the hugodeploy.yml workflow, eliminating the need for manual publishing actions.
Summary
In this third and final blog post of the “Creating My Serverless Blog” series I showed how I automated the deployment/publishing of new blog content using GitHub Actions. The automated publishing is triggered by changes (Git push and merge events) made to the master branch.
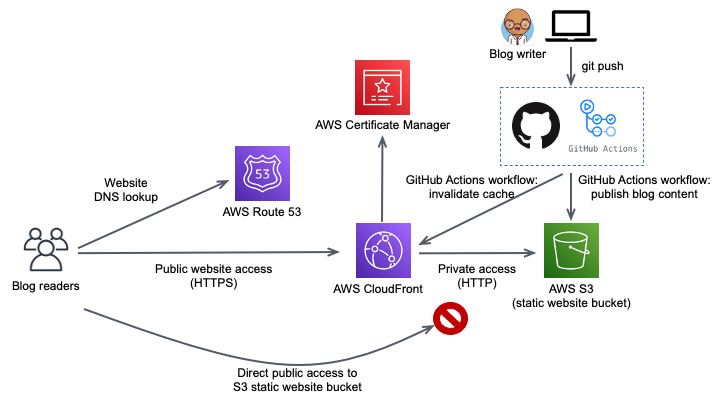
My final serverless blog architecture, including the GitHub Actions CI/CD publishing pipeline, now looks as follows:
Also checkout my previous blog posts in this series:
- Creating My Serverless Blog - Part 1, which addresses the use of Hugo, a static site generator (SSG), to generate my static blog site;
- Creating My Serverless Blog - Part 2, which addresses how I used AWS services to host and deliver my static blog site;
To update the local blog and embedded Hugo theme Git repositories, and synchronize them with their remote counterparts, use the following commands:
↩︎# navigate to the blog directory cd blog # update the local blog repo (superproject) git checkout master git pull # update the local embedded Hugo repo (subproject) git submodule update --remoteIf you do not cleanup the Hugo output directory, you run the risk of the wrong files (e.g. drafts or future posts) being left behind and consequently being published. ↩︎
comments powered by Disqus